In this tutorial, we will learn how to set up AEM Dispatcher for a Publish Instance in our local environment on a Windows machine. For this, we need the IIS manager to host the website.
Preparing for Setup
If you have not completed the prerequisites, go through our other tutorial on How to Install/Enable IIS (Internet Information Service) Manager on Windows before starting this one.
Another prerequisite is to go through the Setup AEM Dispatcher for Author Instance in Local Environment on Windows. Once you have followed it till step 2, the final directory structure inside inetpub should look like this –

After completing the above steps, head toward the IIS manager and create a new website called weretail. Perform the similar handler mappings setup but this time, configure it with the publisher’s “dispatcher.any” file using the “Add Wildcard script map” option.
Refer to the below screenshot to set up the dispatcher configuration in the handler mapping.

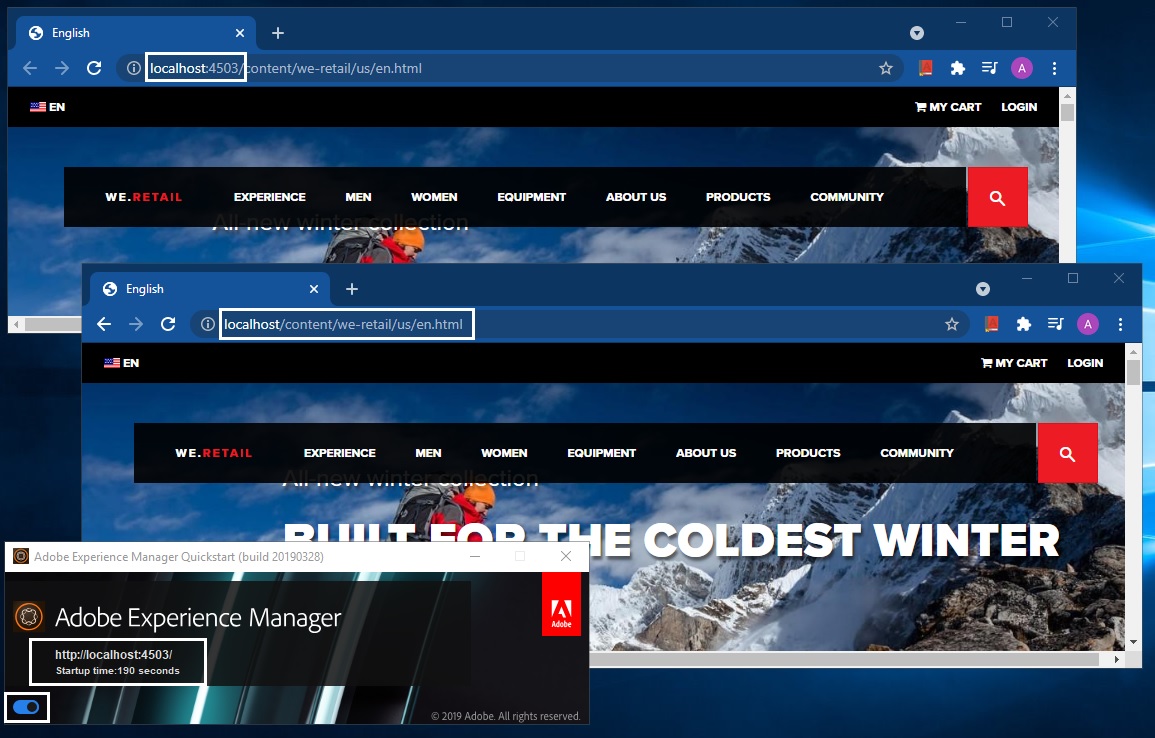
If the above configuration is done in the right manner and the AEM publish server is up and running on port 4503, you should be able to browse http://localhost/content/we-retail/us/en.html in the browser of your choice.
You will notice that the cache has started to populate as and when the browsing happens. You can also check the cached content in the site’s docroot folder after browsing the weretail site for a while in localhost.
Troubleshooting AEM Dispatcher for Publish
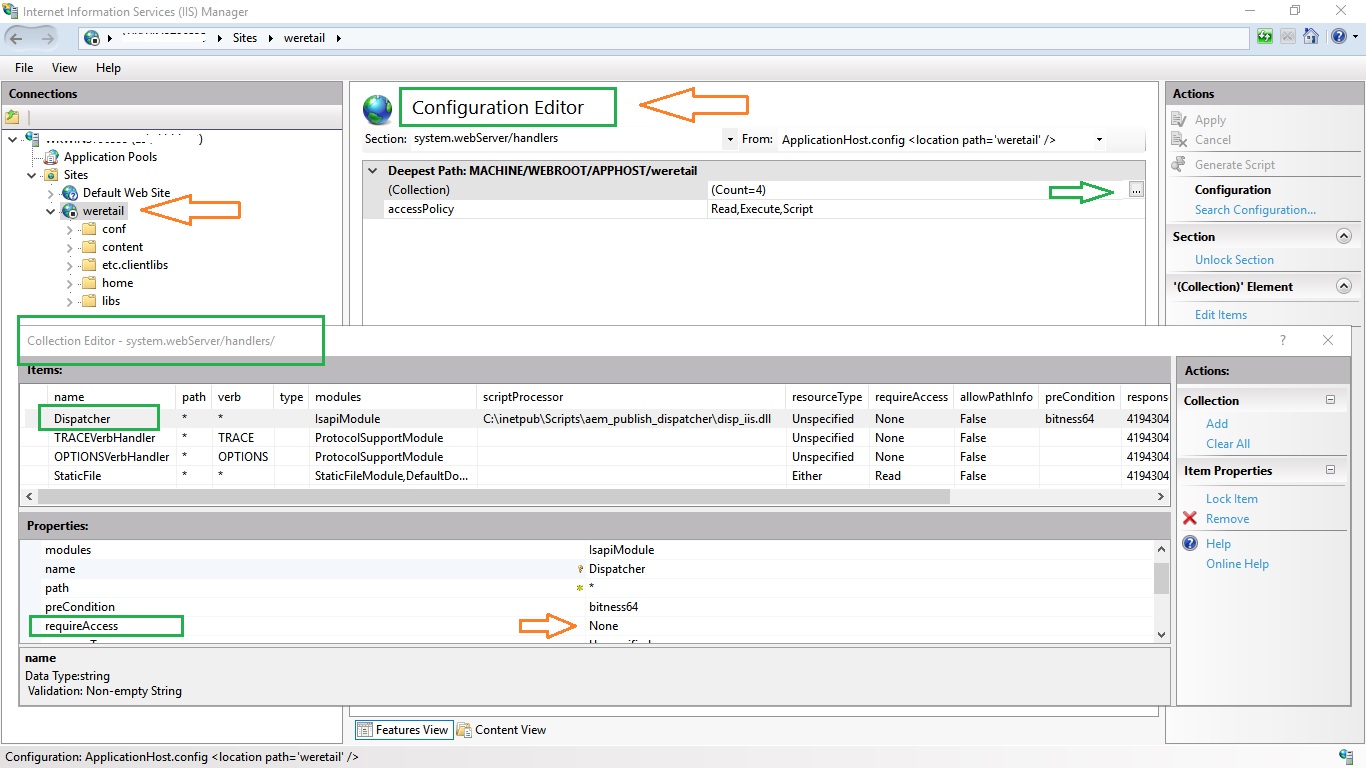
1. Blank page coming up when browsing the we-retail
You may face the issue where your cache is getting created but you see a blank page in the browser. The first step is to check the dispatcher logs. In the logs you might find the following error-
HSE_REQ_EXEC_URL(/content/we-retail/us/en.html) returned: 000003E9Check out the next screenshot to fix it and make sure to set the requestAccess properties to “None”.
2. Navigation menu not appearing or coming up
Another problem you might face with the configured dispatcher.any file is that the navigation items are not coming up.
Solution: Replace the /filter section with the following code
# The filter section defines the requests that should be handled by the dispatcher.
#
# Entries can be either specified using globs, or elements of the request line:
#
# (1) globs will be compared against the entire request line, e.g.:
#
#     /0001 { /type "deny" /glob "* /index.html *" }
#
#   matches request "GET /index.html HTTP/1.1" but not "GET /index.html?a=b HTTP/1.1".
#
# (2) method/url/query/protocol will be compared againts the respective elements of
#   the request line, e.g.:
#
#     /0001 { /type "deny" /method "GET" /url "/index.html" }
#
#   matches both "GET /index.html" and "GET /index.html?a=b HTTP/1.1".
#
# Note: specifying elements of the request line is the preferred method.
/filter
{
	# Deny everything first and then allow specific entries
	/0001 { /type "deny" /glob "*" }

	# Open consoles
	#/0011 { /type "allow" /url "/admin/*"  }  # allow servlet engine admin
	#/0012 { /type "allow" /url "/crx/*"    }  # allow content repository
	#/0013 { /type "allow" /url "/system/*" }  # allow OSGi console

	# Allow non-public content directories
	#/0021 { /type "allow" /url "/apps/*"   }  # allow apps access
	#/0022 { /type "allow" /url "/bin/*"    }
	 /0023 { /type "allow" /url "/content*" }  # disable this rule to allow mapped content only

	#/0024 { /type "allow" /url "/libs/*"   }
	#/0025 { /type "deny"  /url "/libs/shindig/proxy*" } # if you enable /libs close access to proxy

	#/0026 { /type "allow" /url "/home/*"   }
	#/0027 { /type "allow" /url "/tmp/*"    }
	#/0028 { /type "allow" /url "/var/*"    }

	# We.Retail Alert: Allows We.Retail clientlibs to pass through -- new change
	/0029 { /type "allow" /url "/etc.clientlibs/*" }

	# Enable extensions in non-public content directories, using a regular expression
	/0041
	{
		/type "allow"
		#/extension '(clientlibs|css|gif|ico|js|png|swf|jpe?g|woff2?)' --old value
		/extension '(css|gif|ico|js|png|swf|jpe?g|woff2|woff|tff)'
	}

	# Enable features
	/0062 { /type "allow" /url "/libs/cq/personalization/*"  }  # enable personalization

	# Deny content grabbing
	#/0081 { /type "deny"  /url "*.infinity.json" } -- old
	#/0082 { /type "deny"  /url "*.tidy.json"     } -- old
	# Deny content grabbing, on all accessible pages, using regular expressions
	/0081
	{
		/type "deny"
		/selectors '((sys|doc)view|query|[0-9-]+)'
		/extension '(json|xml)'
	}
	# Deny content grabbing for /content
	/0082
	{
		/type "deny"
		/path "/content"
		/selectors '(feed|rss|pages|languages|blueprint|infinity|tidy)'
		/extension '(json|xml|html)'
	}

	#/0083 { /type "deny"  /url "*.sysview.xml"   }
	#/0084 { /type "deny"  /url "*.docview.json"  }
	#/0085 { /type "deny"  /url "*.docview.xml"  }

	#/0086 { /type "deny"  /url "*.*[0-9].json" } --old
	# We.Retail Alert: Allow We.Retail to request .cart.json info for the shopping cart information. -- new change
	/0086 { /type "allow" /method "GET" /extension 'json' "*.cart.json" }

	#/0087 { /type "allow" /method "GET" /url "*.1.json" }  # allow one-level json requests

	# Deny query (and additional selectors)
	#/0090 { /type "deny"  /url "*.query*.json" }
}
You may want to compare it with the existing “dispatcher.any” to understand the difference and also after changing the above code snippet, cross-check if the navigation item has started appearing.
I hope the above steps, screenshots, and troubleshooting steps are helpful in completing the configuration on your computer. Feel free to drop in a comment if you get stuck while doing this setup of AEM Dispatcher for Publish. We will definitely try to discuss and resolve it. Have fun doing the setup!
Further readings
- https://github.com/adobe/aem-dispatcher-experiments/blob/main/docs/Local-Dispatcher-Windows.md#browser-shows-empty-content
- https://experienceleague.adobe.com/docs/experience-manager-dispatcher/using/configuring/dispatcher-configuration.html#dispatcher-configuration-files
- https://experienceleague.adobe.com/docs/experience-manager-dispatcher/using/configuring/dispatcher-configuration.html?lang=en#specify-a-default-page-iis-only-homepage


